12 junho 2025

canon 350D firmware 1.02 better lens focus firmware (1.03 firmware have worst lens focus)


canon 350D firmware 1.02 better lens focus firmware (1.03 firmware have worst lens focus)


link for the file

https://drive.google.com/file/d/1YBkUleCCCcJ__vTO1jZXF_RXEq-HOuA9/view?usp=sharing


save the file on memory card in last option on menu with says firmware version you click ok and the camera does the firmware update

22 abril 2025

strain gauge block cr10 smart fix your leveling on your cr10 smart


English

Tired of trying to level up your CR10 Smart and never getting it right? Then with this upgrade you will achieve that…. But first you have to check how the nozzle moves up and down... with the machine stopped and not heating... with the hotend in an elevated position... open the cover behind the X-axis motor and push the CR10 Smart hotend up with your finger. If a blue light flashes, it means it is reading correctly... sometimes when the hotend screws are too tight, the hotend always has the light on... we want this light to come on easily with a light touch... you will have to make sure that there will be nothing "holding" the hotend in place... and when you close the hotend cover... make sure that the wiring will pass through the front of the hotend just above the cooling system... and never on top of the hotend... because the wires being on top prevent the leveling system from moving freely... after making sure of this, tighten the 3 screws on the hotend cover... they are crucial to keeping it aligned.
Note: Whenever you are going to make a new print, make sure that there is no filament left in the nozzle because even the slightest bit of filament will affect the leveling... because the nozzle touches the table "cold" and that is why there is always a different random reading on the cr10 smart and others that use this method with strain gauge.


-----------------------------------------------------

(portuguese)

cansado de tentar ficar nivelando a sua cr10 smart e nunca ficar correto? então com esse upgrade voce vai conseguir isso…. mas primeiro você tem que verificar como esta o movimento do bico para cima e para baixo… com a maquina parada e sem aquecer… com o hotend numa posição elevada… abra a tampinha que fica atras do motor do eixo X e empurre com o dedo para cima o hotend da cr10 smart se piscar uma luz azul é q esta lendo corretamente…  as vezes quando os parafusos do hotend estão muito apertados o hotend fica sempre com a luz acesa… queremos q essa luz acenda facilmente com o um leve toque… você vai ter que se certificar q não vai ter nada “prendendo” o hotend no lugar… e quando for fechar a capa do hotend… se certifique que a fiação vai passar pela frente do hotend logo acima do sistema de resfriamento… e nunca na parte de cima do hotend… pois os fios ficando em cima previne do sistema de nivelamento mover livremente…  apos se certificar disso prenda os 3 parafusos da capinha do hotend…. eles são cruciais para manter ele alinhado


obs. sempre quando for fazer uma nova impressão certifique-se q não tem nenhum resto de filamento no bico pois aquele resto o minimo que seja vai afetar o nivelamento… pois o bico da um toque na mesa “frio” e por isso  q sempre tem uma leitura aleatória diferente na cr10 smart e outras q usam esse metodo com strain gauge 


link para o arquivo: https://www.printables.com/model/1273397-strain-gauge-block-cr10-smart-fix-your-leveling-on

17 abril 2025

how to print better with cr10 smart with little upgrades and a gcode tweak on cura (Como imprimir melhor com o CR10 Smart com pequenas atualizações e um ajuste no Gcode no Cura)


(english)

how to print better with cr10 smart with little upgrades and a gcode tweak on cura


upgrade to pei sheet... the prints now print to much better...
and i use a blue cheap metal extruder from aliexpress only you need to recalculate your e-steps (have a good video on youtube to calibrate e-estpes no cr10 smart)


and i use this start gcode on cura (use cr10s pro profile)
----------------------------------------------------------------------------------

M201 X500.00 Y500.00 Z100.00 E5000.00 ; Setup machine max acceleration

M203 X500.00 Y500.00 Z10.00 E50.00 ; Setup machine max feedrate

M204 P500.00 R1000.00 T500.00 ; Setup Print/Retract/Travel acceleration

M205 X8.00 Y8.00 Z0.40 E5.00 ; Setup Jerk

M220 S100 ; Reset Feedrate

M221 S100 ; Reset Flowrate


M140 S{material_bed_temperature_layer_0} ; Iniciar aquecimento da mesa

M190 S{material_bed_temperature_layer_0} ; Aguardar a mesa atingir a temperatura


G28 ; Home (X, Y, Z)


M420 S1 ; Habilitar nivelamento da malha


G1 X5 Y5 Z10 F5000 ; Levar o bico para um canto e subir um pouco


M104 S{material_print_temperature_layer_0} ; Iniciar aquecimento do bico

M109 S{material_print_temperature_layer_0} ; Aguardar o bico atingir a temperatura


G92 E0 ; Reset Extruder

G1 Z2.0 F3000 ; Move Z Axis up

G1 X10.1 Y20 Z0.28 F5000.0 ; Move to start position

G1 X10.1 Y200.0 Z0.28 F1500.0 E15 ; Draw the first line

G1 X10.4 Y200.0 Z0.28 F5000.0 ; Move to side a little

G1 X10.4 Y20 Z0.28 F1500.0 E30 ; Draw the second line

G92 E0 ; Reset Extruder

G1 Z2.0 F3000 ; Move Z Axis up

--------------------------------------------------------------------------------------------------


the nozzle does a little bump and wait in the corner to the bed heat... after that the nozzle heats up and start the print....


--------------------------------------------------------------------------------------------------

and the secret end gcode

G91 ; Modo de posicionamento relativo

G1 E-6 F2400 ; Retração maior do filamento (6 mm)

G1 Z0.2 F2400 ; Sobe um pouco o bico para evitar marcas na peça

G1 X5 Y5 F3000 ; Move o bico um pouco para o lado (wipe out)

G1 Z10 ; Sobe o bico mais um pouco para segurança


G90 ; Volta para posicionamento absoluto

G1 X0 Y{machine_depth} ; Move o bico para a frente da mesa (apresentar a peça)


M107 ; Desliga o ventilador de peça

M104 S0 ; Desliga o aquecimento do hotend

M140 S0 ; Desliga o aquecimento da mesa

M84 ; Libera todos os motores


G4 S120 ; Aguarda 120 segundos (2 minutos) para resfriamento passivo

-------------------------------------------------------------------------------------------------


M81 ; Desliga a impressora (se suportado pelo firmware e hardware)

at end of print , the printer retract the filament a little more to clean the nozzle of any filament... and a m81 command to shutdown the printer after 3 minutes of cooldown


now finally the print prints much better.... and you need a good filament dryer helps alot if live in area with much humidity (portuguese)


Como imprimir melhor com o CR10 Smart com pequenas atualizações e um ajuste no Gcode no Cura Atualizei para a folha PEI... as impressões agora estão muito melhores... E eu uso uma extrusora de metal azul barata do Aliexpress, só que você precisa recalcular seus e-steps (tem um bom vídeo no YouTube para calibrar e-steps no CR10 Smart). E eu uso este Gcode inicial no Cura (Eu usei o profile da cr10 s pro no cura) ---------------------------------------------------------------------------------- M201 X500,00 Y500,00 Z100,00 E5000,00; Configurar aceleração máxima da máquina M203 X500,00 Y500,00 Z10,00 E50,00; Configurar taxa de avanço máxima da máquina M204 P500,00 R1000,00 T500,00; Configurar aceleração de impressão/retração/deslocamento M205 X8,00 Y8,00 Z0,40 E5,00 ; Configuração idiota M220 S100; Redefinir taxa de avanço M221 S100; Redefinir vazão M140 S{material_bed_temperature_layer_0} ; Iniciar aquecimento da mesa M190 S{material_bed_temperature_layer_0} ; Aguardar a mesa atingir a temperatura G28; Início (X, Y, Z) M420S1; Habilitar nivelamento da malha G1 X5 Y5 Z10 F5000; Levar o bico para um canto e subir um pouco M104 S{material_print_temperature_layer_0} ; Iniciar aquecimento do bico M109 S{material_print_temperature_layer_0} ; Manter o bico atingir a temperatura G92 E0 ; Reiniciar Extrusora G1 Z2.0 F3000 ; Mover o eixo Z para cima G1 X10.1 Y20 Z0.28 F5000.0 ; Mover para a posição inicial G1 X10.1 Y200.0 Z0.28 F1500.0 E15 ; Desenhar a primeira linha G1 X10.4 Y200.0 Z0.28 F5000.0 ; Mover um pouco para o lado G1 X10.4 Y20 Z0.28 F1500.0 E30 ; Desenhar a segunda linha G92 E0 ; Reiniciar Extrusora G1 Z2.0 F3000 ; Mova o eixo Z para cima -------------------------------------------------------------------------------------------------- o bico dá uma pequena pancada e espera no canto a cama esquentar... depois disso o bico esquenta e inicia a impressão.... -------------------------------------------------------------------------------------------------- e o gcode final secreto G91; Modo de posicionamento relativo G1 E-6 F2400; Retração maior do filamento (6 mm) G1 Z0.2 F2400; Sobe um pouco o bico para evitar marcas na peça G1 X5 Y5 F3000; Move o bico um pouco para o lado (wipe out) G1Z10; Sobe o bico mais um pouco para segurança G90; Volta para posicionamento absoluto G1 X0 Y{profundidade_máquina} ; Mover o bico para a frente da mesa (apresentar a peça) M107; Desligue o ventilador da peça M104S0; Desligue o aquecimento do hotend M140S0; Desliga o aquecimento da mesa M84; Libera todos os motores G4S120; Aguarda 120 segundos (2 minutos) para pagar passivo -------------------------------------------------------------------------------------------- M81; Desliga a impressora (é suportado pelo firmware e hardware) no final da impressão, a impressora retrai o filamento um pouco mais para limpar o bocal de qualquer filamento... e um comando m81 para desligar a impressora após 3 minutos de resfriamento agora finalmente a impressão fica muito melhor.... e você precisa de um bom secador de filamento ajuda muito se morar em área com muita umidade

02 abril 2025

gcode command to heat the print bed and then heat the hotend on the cr10 smart / comando gcode para aquecer a mesa de impressão e apos isso aquecer o hotend na cr10 smart


Frapê the cat - miss you... 


english


gcode command to heat the print bed and then heat the hotend on the cr10 smart


This gcode is for the Cura slicer, I'm using the CR10S Pro profile (the only profile that saves the bed mesh)


With this gcode, it's possible to heat the print bed, home the hotend and then heat it like this to prevent the nozzle from dirtying the bed with filament.


Start gcode

M201 X500.00 Y500.00 Z100.00 E5000.00 ; Setup machine max acceleration

M203 X500.00 Y500.00 Z10.00 E50.00 ; Setup machine max feedrate

M204 P500.00 R1000.00 T500.00 ; Setup Print/Retract/Travel acceleration

M205 X8.00 Y8.00 Z0.40 E5.00 ; Setup Jerk

M220 S100 ; Reset Feedrate

M221 S100 ; Reset Flowrate


M140 S{material_bed_temperature_layer_0} ; Iniciar aquecimento da mesa

M190 S{material_bed_temperature_layer_0} ; Aguardar a mesa atingir a temperatura


G28 ; Home (X, Y, Z)


M420 S1 ; Habilitar nivelamento da malha


G1 X5 Y5 Z10 F5000 ; Levar o bico para um canto e subir um pouco


M104 S{material_print_temperature_layer_0} ; Iniciar aquecimento do bico

M109 S{material_print_temperature_layer_0} ; Aguardar o bico atingir a temperatura


G92 E0 ; Reset Extruder

G1 Z2.0 F3000 ; Move Z Axis up

G1 X10.1 Y20 Z0.28 F5000.0 ; Move to start position

G1 X10.1 Y200.0 Z0.28 F1500.0 E15 ; Draw the first line

G1 X10.4 Y200.0 Z0.28 F5000.0 ; Move to side a little

G1 X10.4 Y20 Z0.28 F1500.0 E30 ; Draw the second line

G92 E0 ; Reset Extruder

G1 Z2.0 F3000 ; Move Z Axis up


Portugues

comando gcode para aquecer a mesa de impressão e apos isso aquecer o hotend na cr10 smart

Este gcode é para o fatiador Cura, estou usando o perfil CR10S Pro (o único perfil que salva a malha da cama)


Com este gcode, é possível aquecer a cama de impressão, colocar o hotend em casa e então aquecê-lo assim para evitar que o bico suje a cama com filamento.


Start gcode

M201 X500.00 Y500.00 Z100.00 E5000.00 ; Setup machine max acceleration

M203 X500.00 Y500.00 Z10.00 E50.00 ; Setup machine max feedrate

M204 P500.00 R1000.00 T500.00 ; Setup Print/Retract/Travel acceleration

M205 X8.00 Y8.00 Z0.40 E5.00 ; Setup Jerk

M220 S100 ; Reset Feedrate

M221 S100 ; Reset Flowrate


M140 S{material_bed_temperature_layer_0} ; Iniciar aquecimento da mesa

M190 S{material_bed_temperature_layer_0} ; Aguardar a mesa atingir a temperatura


G28 ; Home (X, Y, Z)


M420 S1 ; Habilitar nivelamento da malha


G1 X5 Y5 Z10 F5000 ; Levar o bico para um canto e subir um pouco


M104 S{material_print_temperature_layer_0} ; Iniciar aquecimento do bico

M109 S{material_print_temperature_layer_0} ; Aguardar o bico atingir a temperatura


G92 E0 ; Reset Extruder

G1 Z2.0 F3000 ; Move Z Axis up

G1 X10.1 Y20 Z0.28 F5000.0 ; Move to start position

G1 X10.1 Y200.0 Z0.28 F1500.0 E15 ; Draw the first line

G1 X10.4 Y200.0 Z0.28 F5000.0 ; Move to side a little

G1 X10.4 Y20 Z0.28 F1500.0 E30 ; Draw the second line

G92 E0 ; Reset Extruder

G1 Z2.0 F3000 ; Move Z Axis up


16 janeiro 2025

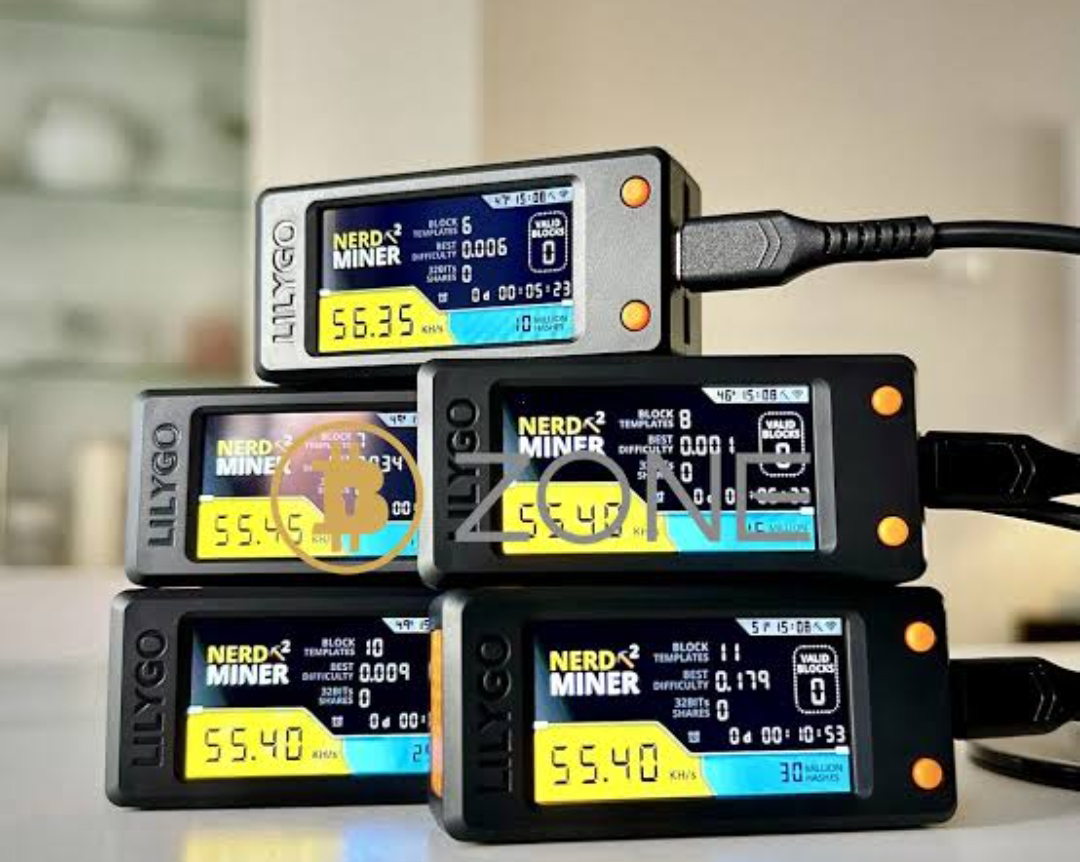
Nerdminer pools (esp32 miner)


English

you can mine in several different pools with nerdminer, here are some 

Bitcoin cash (bch) pool (lottery miner)

https://pool.bchsolo.com/
pool configuration

url: pool.bchsolo.com:
Port: 3333

and your bch wallet address


Portuguese:

voce pode minerar em varias pools diferentes com o nerdminer, segue algumas 


pool de Bitocoin cash (bch) (lottery miner)

https://pool.bchsolo.com/


configuração da pool

url:  

pool.bchsolo.com:
Port: 3333

e o endereço da sua carteira bch


21 dezembro 2024

se voce esta com problemas para flashear um esp32 s2 mini wemos aqui esta a solução (english if you are having problems flashing an esp32 s2 mini wemos here is the solution)


English


if you are having problems flashing an esp32 s2 mini wemos here is the solution you need to install the driver - CP210x Windows Drivers (or the page link https://www.silabs.com/developer-tools/usb-to-uart-bridge-vcp-drivers?tab=downloads installing this driver you can you flash the esp32 s2 mini wemos normally


Portugues

se voce esta com problemas para flashear um esp32 s2 mini wemos aqui esta a solução

é necessario que voce instale o driver - CP210x Windows Drivers (ou o link da pagina https://www.silabs.com/developer-tools/usb-to-uart-bridge-vcp-drivers?tab=downloads instalando esse driver voce consegue flashear o esp32 s2 mini wemos normalmente 


25 agosto 2024

Aviso importante referente ao nivelamento automatico com o comando M420 S1 Z0 ; Enable Bed Levelling Mesh no star gcode


Aviso importante referente ao nivelamento automatico com o comando M420 S1 Z0 ; Enable Bed Levelling Mesh no star gcode


sempre apos o g28 no marlin ele reseta os parametros da mesa então sempre tem que colocar o comando novamente do 

 M420 S1 Z0 ; Enable Bed Levelling Mesh no star gcode


no meu caso utilizo na anycubic kobra e outras

Evite sujeira de filamento na heatbed da cr10 smart e cr6 se com este gcode (Avoid filament dirt on the cr10 smart and cr6 se heatbed with this gcode)


Português

Evite sujeira de filamento na heatbed da cr10 smart e cr6 se com este gcode, voce esta cansado de sempre tentar iniciar a sua impressão na cr10 smart (pro) e ter sujeira de filamento na sua mesa enquanto o bico esquenta?

este gcode resolve esse problema dependendo do slicer é em uma area diferente  aonde deve inseri-lo

 creditos:

 start gcocde: https://damsteen.nl/blog/2020/10/25/creality-cr6-start-print-without-drooping

end gcode: https://gist.github.com/Sebazzz/58825c5dedcb09029fe57eec474880e9 (
Sebazzz)


Segue o código start gcode


     ; Preamble
M420 S1 ; restore abl mesh
M201 X500.00 Y500.00 Z100.00 E5000.00 ;Setup machine max acceleration
M203 X500.00 Y500.00 Z10.00 E50.00 ;Setup machine max feedrate
M204 P500.00 R1000.00 T500.00 ;Setup Print/Retract/Travel acceleration
M205 X8.00 Y8.00 Z0.40 E5.00 ;Setup Jerk
M220 S100 ;Reset Feedrate
M221 S100 ;Reset Flowrate

; Heat nozzle just enough to accurately home without drooping
M140 S50
M104 S120
M190 S50
M109 S120
M105

; - Home - this is used with the strain gauge as a zero position for the Z-offset
G28

M420 S1 Z0 ; Enable Bed Levelling Mesh


; Now we know the positions we can move out of the way and happily droop at the side of the bed
M104 S{material_print_temperature}
M140 S{material_bed_temperature}
M105

G0 Z20
G0 X0 Y0

; Now wait for the temperatures to reach
M190 R{material_bed_temperature}
M109 S{material_print_temperature}
M105

; And we can now draw our purge line
G92 E0 ;Reset Extruder
G1 Z2.0 F3000 ;Move Z Axis up
G1 X10.1 Y20 Z0.28 F5000.0 ;Move to start position
G1 X10.1 Y200.0 Z0.28 F1500.0 E15 ;Draw the first line
G1 X10.4 Y200.0 Z0.28 F5000.0 ;Move to side a little
G1 X10.4 Y20 Z0.28 F1500.0 E30 ;Draw the second line
G92 E0 ;Reset Extruder
G1 Z2.0 F3000 ;Move Z Axis up


 aqui é um exemplo de configurar no cura.


e cola nesta área escrito start gcode


para a finalização do gcode é o mesmo procedimento mas só colar no quadro da direita... lembrando que você tem que apagar o código anterior .


End Gcode


M104 S0 ; turn off temperature
M140 S0 ; turn off heatbed
M107 ; turn off fan
{if layer_z < max_print_height}G1 Z{z_offset+min(layer_z+10, max_print_height)} F600{endif} ; Move print head up
G1 X0 Y200 F3000 ; present print
M84 X Y E ; disable motors

M117 All Done
M300 S500
G1 X0 Y230 ;Present print
M106 S0 ;Turn-off fan
M104 S0 ;Turn-off hotend
M140 S0 ;Turn-off bed

M117 Notifying
M300 P100
G4 P250
M300 P50
G4 P150
M300 P100

M84 X Y E ;Disable all steppers but Z

M117 kthnxbye


English


Avoid filament dirt on the heatbed of the cr10 smart and cr6 se with this gcode, are you tired of always trying to start your printing on the cr10 smart (pro) and having filament dirt on your desk while the nozzle heats up?
this gcode solves this problem depending on the slicer is in a different area where you should insert it
 credits:
 start gcocde: https://damsteen.nl/blog/2020/10/25/creality-cr6-start-print-without-drooping
end gcode: https://gist.github.com/Sebazzz/58825c5dedcb09029fe57eec474880e9 (
Sebazzz)
 
 
Follow the start code gcode
     ; Preamble
M420 S1 ; restore abl mesh
M201 X500.00 Y500.00 Z100.00 E5000.00 ;Setup machine max acceleration
M203 X500.00 Y500.00 Z10.00 E50.00 ;setup machine max feedrate
M204 P500.00 R1000.00 T500.00 ;Setup Print/Retract/Travel acceleration
M205 X8.00 Y8.00 Z0.40 E5.00 ;setup Jerk
M220 S100 ;Reset Feedrate
M221 S100 ;Reset Flowrate
; Heat nozzle just enough to accurately home without drooping
M140 S50
M104 S120
M190 S50
M109 S120
M105
; - Home - this is used with the strain gauge as a zero position for the Z-offset
G28

M420 S1 Z0 ; Enable Bed Levelling Mesh


; Now we know the positions we can move out of the way and happily droop at the side of the bed
M104 S{material_print_temperature}
M140 S{material_bed_temperature}
M105
G0 Z20
G0 X0 Y0
; Now wait for the temperatures to reach
M190 R{material_bed_temperature}
M109 S{material_print_temperature}
M105
; And we can now draw our purge line
G92 E0 ;Reset Extruder
G1 Z2.0 F3000 ;Move Z Axis up
G1 X10.1 Y20 Z0.28 F5000.0 ;Move to start position
G1 X10.1 Y200.0 Z0.28 F1500.0 E15 ;Draw the first line
G1 X10.4 Y200.0 Z0.28 F5000.0 ;Move to side a little
G1 X10.4 Y20 Z0.28 F1500.0 E30 ;Draw the second line
G92 E0 ;Reset Extruder
G1 Z2.0 F3000 ;Move Z Axis up


 here is an example of setting up in the cure.


and paste in this area written start gcode
for the finalization of the gcode is the same procedure but only paste in the right frame... remembering that you have to delete the previous code.
 

End Gcode
M104 S0 ; turn off temperature
M140 S0 ; turn off heatbed
M107 ; turn off fan
{if layer_z < max_print_height}G1 Z{z_offset+min(layer_z+10, max_print_height)} F600{endif} ; Move print head up
G1 X0 Y200 F3000 ; present print
M84 X Y E ; disable motors
M117 All Done
M300 S500
G1 X0 Y230 ;Present print
M106 S0 ;Turn-off fan
M104 S0 ;Turn-off hotend
M140 S0 ;Turn-off bed
M117 Notifying
M300 P100
G4 P250
M300 P50
G4 P150
M300 P100
M84 X Y E ;Disable all steppers but Z
M117 kthnxbye


17 agosto 2024

solução para o wifi da cr10 smart and Pro 3d printer / solution for wifi cr10 smart and pro 3d printer


English

solution for cr10 smart and 3d printer wifi   

To solve the WiFi connectivity problem, download the Creality Cloud apk in version 4.4.2


https://creality-cloud.en.uptodown.com/android/download/77355376


install and carry out the qr code configuration procedures, etc., configuration will be practically instantaneous in this version


After configured and installed, perform the update procedure via wifi of the creality box


Português


solução para o wifi da cr10 smart and  impressora 3d   


para resolver o problema de conectividade do wifi baixa o apk do creality cloud na versão 4.4.2

https://creality-cloud.en.uptodown.com/android/download/77355376

instale e realize os procedimentos de configuração qr code etc, a configuração vai ser praticamente instantânea nessa versão


apos configurado e instalado realize o procedimento de atualização via wifi do creality box 

11 julho 2024

Alternativa ao Google fotos com immich (hospede voce mesmo as suas fotos)


Immich – Sua alternativa pessoal ao Google Fotos

Se você está procurando uma alternativa ao Google Fotos para guardar e organizar suas imagens, o Immich é uma opção incrível. Com ele, você basicamente cria o seu próprio “Google Fotos particular”, rodando num servidor simples via Docker — pode ser em Linux, Windows, ou até num mini PC como um Orange Pi (que custa pouco mais de R$120!).

A ideia aqui é rodar o Immich junto com um mini NAS, criando uma solução compacta e eficiente para backup e organização automática das suas fotos.

O app para Android (e também para iOS) tem um desenvolvimento super ativo e já oferece recursos como:

  • Backup automático das fotos e vídeos

  • Organização por data, local e rostos

  • Interface moderna e rápida

🔗 Acesse o site oficial: https://immich.app/
📅 E veja o roadmap com os recursos que ainda vêm por aí: https://immich.app/roadmap/

18 junho 2024

Firmware with wifi activated in access point mode for two trees tt55 pro (Firmware com wifi ativado no modo acess point para two trees tt55 pro )


English

Firmware for the Two tress tt55 pro laser engraver in access point mode, in which you need to connect to the printer's wifi and accessing the following IP connected to it 192.168.4.1 accesses a printer's web menu with the possibility of uploading files to the her SD remotely 


procedure for updating firmware


atention this firmware only for two treess tt55 pro 


Portuguese

 Firmware para o gravador a laser Two tress tt55 pro no modo acess point, em que voce precisa conectar no wifi da impressora  e acessando o seguinte ip conectado nela 192.168.4.1 acessa um menu web da impressora com a possibilidade de fazer upload de arquivos para o sd dela remotamente 

procedimento para atualizar o firmware


atenção esse firmware é somente para two trees tt55 pro


05 abril 2024

site para colocar firmware em placas para meshtastic que sejam clones da heltec v2 pois o site oficial retorna com erro


 site para colocar firmware em placas para meshtastic que sejam clones da heltec v2 pois o site oficial retorna com erro


nesse site aqui  https://flasher.pdxlocs.com/ voce consegue flashear o firmware sem problemas nessas placas 


29 novembro 2023

Gambiarra para ajustar calibração incorreta de impressora 3d sem mexer no firmware

Gambiarra para ajustar calibração incorreta de impressora 3d sem mexer no firmware


quem estiver com problemas do tamanho do cubo de calibração e não quer mexer no firmware tem uma opção "automática" de redimensionamento no cura, ( horizontal scaling factor shrinkage e vertical scaling factor shrinkage compensation para a altura do z)  eu imprimo um cubo na impressora meço com o paquimetro e coloco a diferença na porcentagem...  vou aumentando a escala até dar os milímetros de diferença na opção escala do cura e depois transplanto os dados nessa opção do print


essa é a diferença que preciso para meu cubo ficar no tamanho certo (exemplo )


19 outubro 2023

Atualização de firmware para lcd Bigtreetech tft24 v.1.1

 Portuguese

tive uma extrema dificuldade em achar os arquivos para o tft 24 para atualiza-lo segue aqui os arquivos 

somente extraia os arquivos no sd

English
I had extreme difficulty finding the files for TFT 24 to update it, follow the files here
you only need to extract the archives on sd folder


link https://drive.google.com/file/d/1Cl89eHvQLeAWgjNtRqAEsF-Beo0cQKcH/view?usp=drive_link

13 setembro 2022

Sjrc F11S app modificado para voar mais de 3km e a 500m versão sjrc free rus 2.6.0 menus em portugues

app (Apk) modificado para o drone Sjrc F11S que habilita funções extras ao drone como voar alem de 3km, habilitar voos de 500metros de altura se seu país permitir e um app mais leve de rodar que o convencional

todos os menus estão em portugues , os audios de alguns avisos estão em russo nada que interfira, creditos ao autor que criou o apk


Link do apk


nova versão do apk do sjrc free para drones sjrc f11s versão em portugues

27 março 2022

Suporte para baterias li-ion 18650 para projetos em 3d / Li-ion 18650 battery holder for 3d projects


projeto simples de carregador de bateria ou suporte para segurar uma bateria de litio 18650, voce pode usar  tiras de niquel ou papel aluminio se quiser prototipar rapidamente, modifiquei um projeto do thingverse  (assim que localizar o autor original coloco os creditos aqui)


é possivel colocar placa controladora de power bank ou o modulo tpl4056 a ideia do sistema é ser modular

english

simple battery charger or stand design to hold an 18650 lithium battery, you can use nickel strips or aluminum foil if you want to prototype quickly, I modified a thingverse project (once I find the original author I'll put the credits here) it is possible to put a power bank controller board or the tpl4056 module the idea of ​​the system is to be modular

download link  https://www.thingiverse.com/thing:5332554


14 março 2022

libre pilot installer cc3d and others and openpilot for drone controller (old)


 tried to search for open pilot and librepilot at official site but the links are offline 


here is the download link for the applications


in the download link have libre pilot installer, openpilot installer and cc3d original firmware

downoad link https://drive.google.com/drive/folders/1rJWpt_Ltmj9zVvZVNbyUy_n9XnvLbvCY?usp=sharing


31 dezembro 2020

anet a8 plus to use bowden extruder and all metal hotend on cura gcode ate end to prevent clogs

the command to use a bowden extruder on anet a8 plus at end gcode (end of printing to prevent clogs)

on all metal extruder

the command line in blue in this screen 


or copy this command line


M104 S0

M140 S0

G92

G1 F2000

G28 X0 Y0